Costume & Wardrobe
Manage your entire costume inventory from acquisition through retirement. Track assignments, cleaning schedules, repairs, and utilization across your season.
Before You Start
The Costume & Wardrobe module is your central hub for tracking every costume, mask, accessory set, and prosthetics kit your attraction owns. It covers the full lifecycle of each item: adding it to inventory, assigning it to employees for show nights, tracking cleaning and repairs, and reviewing utilization data at season end.
Before you start adding costumes, you should have your Areas & Positions configured. While areas are not required for costumes, linking costumes to areas makes inventory organization, search, and reporting much more useful. You should also have at least one approved employee in Employee Management before you can assign costumes.
Real-world example: A mid-sized haunt with 30 scare actors might have 50 costume items spanning five areas. Each area has a mix of full costumes, masks, and accessory sets. Before opening night, the admin adds every item to inventory, assigns cleaning frequencies based on fabric type, and pre-assigns costumes to employees by event date. On show nights, costumes are returned through the dashboard and automatically routed to cleaning or flagged for repair.
Wardrobe Dashboard
The wardrobe dashboard is your command center for costume management. It has three main areas: the header with search and action buttons, the stats cards row, and the tabbed content area.
Stats Cards
Five clickable stat cards sit below the header. Each card shows a count for a different inventory status:
- Total Costumes -- the total count of all active costumes in your inventory.
- Available -- costumes ready to be assigned to an employee.
- Assigned -- costumes currently checked out to an employee.
- In Cleaning -- costumes that have been sent for cleaning and are not yet available.
- Needs Repair -- costumes flagged as damaged that need attention before they can be used again.
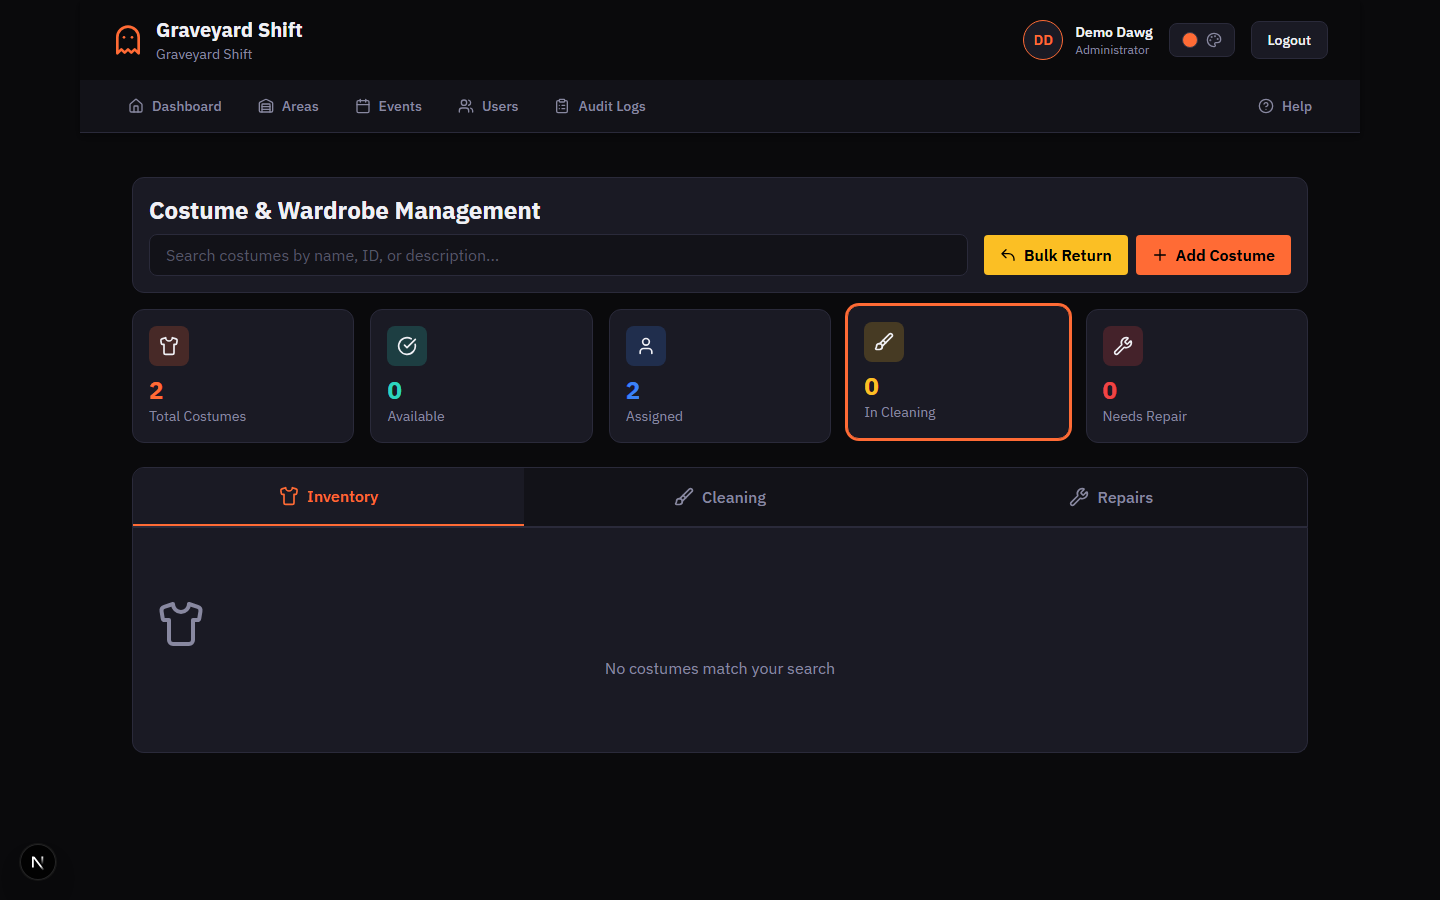
Clicking any stat card filters the inventory grid to show only costumes in that status. Click the same card again to clear the filter and return to the full list.
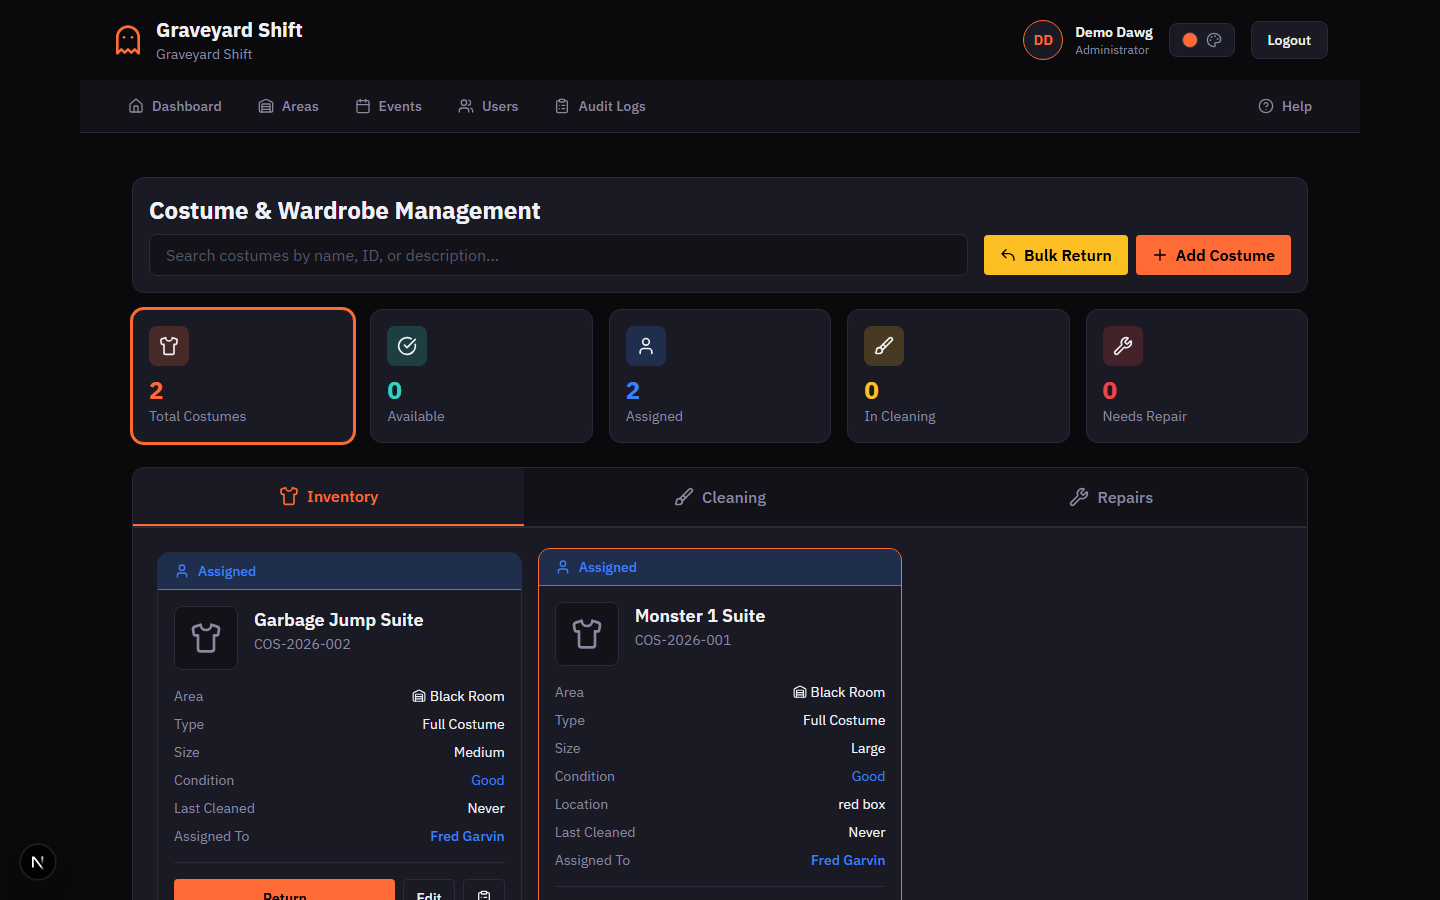
Dashboard Tabs
The dashboard has three tabs:
- Inventory -- the main costume grid showing all items as cards. Each card displays the costume name, ID code, type, size, condition, area, last cleaned date, and action buttons appropriate to the costume's current status.
- Cleaning -- a dedicated view for managing the cleaning workflow. Shows costumes grouped by urgency: Overdue, Due Today, and Upcoming. A badge on the tab shows the count of items currently in cleaning.
- Repairs -- a queue of costumes flagged as needing repair. Each item shows the costume name, ID code, area, condition, and the date it was flagged. A badge on the tab shows the count of items awaiting repair.
Searching Costumes
The search bar in the dashboard header lets you find costumes by name, ID code, or description. Results update as you type (with a brief debounce delay). You can combine search with a status filter -- for example, type a name fragment while filtering by "Available" to quickly locate a specific costume that is ready for assignment.
Adding Costume Items
Every costume in your wardrobe starts by being added to inventory. The system tracks the full lifecycle from this point forward.
Open the Wardrobe Dashboard
From the Admin Dashboard, navigate to Costume & Wardrobe Management. The dashboard opens on the Inventory tab showing all costume items as cards with status badges.
Click Add Costume
Click the Add Costume button in the dashboard header. A modal dialog opens with the costume creation form.
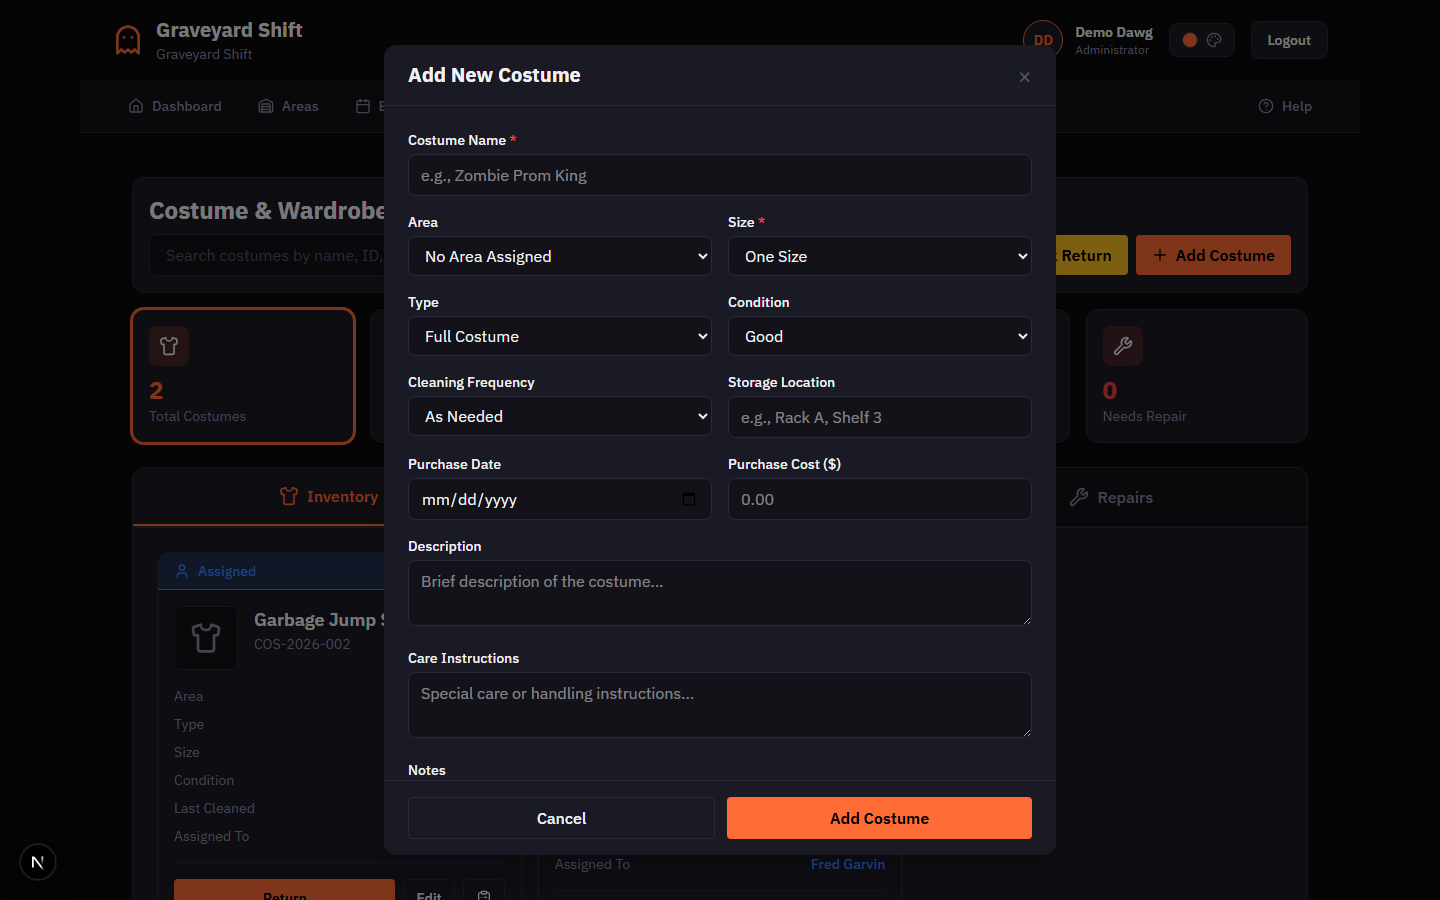
Fill in the costume details
Enter the costume name (required) and select the size (required). Optionally assign the costume to an area, choose the costume type, set the initial condition, select a cleaning frequency, and enter a storage location. You can also record the purchase date and cost for asset tracking.
Add care instructions and notes
Use the Care Instructions field for special handling or washing requirements. The Notes field can hold any additional information about the costume, such as alteration history or vendor details.
Click Add Costume to save
Click Add Costume at the bottom of the modal. The system generates a unique ID code (e.g., COS-2026-001) and the costume appears immediately in the inventory grid with an "Available" status.
Costume Fields
| Field | Required | Description |
|---|---|---|
Costume Name | Yes | A descriptive name for the costume. Examples: "Zombie Prom King", "Victorian Ghost Bride", "Chainsaw Clown Jumpsuit". |
Size | Yes | The garment size. Options: Extra Small (XS), Small (S), Medium (M), Large (L), Extra Large (XL), 2XL, or One Size. |
Area | No | The area this costume belongs to. Linking a costume to an area helps with organization and area-based reporting. |
Type | No | The category of the costume item. Options: Full Costume, Mask Only, Accessory Set, or Makeup/Prosthetics. Defaults to Full Costume. |
Condition | No | The current physical condition. Options: Excellent, Good, Fair, or Poor. Defaults to Good. A Poor condition automatically flags the item for repair. |
Cleaning Frequency | No | How often the costume needs to be cleaned. Options: After Each Use, Every 3 Uses, Weekly, or As Needed. This drives the automated cleaning schedule. |
Storage Location | No | Where the costume is stored when not in use. Examples: "Rack A, Shelf 3", "Costume Trailer Bin 12". Shown in search results for quick retrieval. |
Purchase Date | No | When the costume was acquired. Useful for tracking asset age and planning replacement budgets. |
Purchase Cost | No | The original cost of the costume in dollars. Used in utilization reports alongside maintenance costs. |
Description | No | A brief description of the costume appearance or components included. |
Care Instructions | No | Special care, washing, or handling instructions for this costume. Examples: "Dry clean only", "Hand wash cold, air dry". |
Notes | No | Any additional information such as vendor details, alteration history, or replacement part notes. |
Editing Costumes
To edit an existing costume, click the Edit button on the costume card. The same modal opens pre-filled with the current values. Make your changes and click Save Changes. Edits take effect immediately and the updated details appear on the card.
Assigning Costumes to Employees
Costume assignments link an inventory item to a specific employee, optionally for a specific event date. Once assigned, the costume cannot be assigned to anyone else until it is returned.
Find the costume to assign
Use the search bar or status filter cards to locate the costume. Only costumes with an "Available" status can be assigned. The Assign button appears on each Available costume card.

Click Assign on the costume card
Click the Assign button. The assignment modal opens, pre-filled with the costume name.
Select the employee and event date
Choose the employee who will receive the costume. The list only shows approved employees in your company. Optionally select an event date to tie the assignment to a specific show night.
Confirm the assignment
Review the details and click Assign. The costume status changes from "Available" to "Assigned" and the employee name appears on the costume card. The usage counter increments by one, which feeds into the cleaning schedule.
Position-Based Costumes
When you create a position in Areas & Positions, you can link it to a specific costume. This means every employee assigned to that position automatically knows which costume they need. The linked costume is excluded from the general assignment pool for other positions, preventing double-booking.
Returning Costumes
When an employee returns a costume after a show night, the return process captures a condition assessment and determines what happens next.
Find the assigned costume
Locate the costume in the inventory. Costumes with "Assigned" status show a Return button and display the name of the employee who currently has the item.
Click Return
Click the Return button on the costume card. The return modal opens showing the costume name and the current assignment details.
Assess the condition at return
Select the condition of the costume upon return: Excellent, Good, Fair, or Poor. If you select Poor, the costume is automatically flagged for repair and placed in the repair queue. For any other condition, a "Send to Cleaning" checkbox appears so you can optionally route the item directly to cleaning.
Click Confirm Return
Click Confirm Return to complete the process. The costume status updates based on your assessment: Available (default), In Cleaning (if you checked the box or the cleaning frequency triggers it), or Needs Repair (if condition is Poor).
Bulk Returns
After a busy show night, returning costumes one at a time can be tedious. The Bulk Return button in the dashboard header streamlines this process. Click it to open a dropdown of recent event dates. Select the date and you will see all unreturned costumes for that night. Set the condition for each item and process all returns in a single batch. The same status logic applies: Poor condition items go to the repair queue, and cleaning frequency rules are respected for each costume individually.
Tracking Costume Condition
Costume condition is tracked throughout the entire lifecycle. The four condition levels -- Excellent, Good, Fair, and Poor -- appear on every costume card and are recorded at every assignment and return. Two dedicated tabs on the dashboard help you manage cleaning and repairs.
Cleaning Schedule
The Cleaning tab shows costumes that need cleaning, grouped by urgency:
- Overdue -- costumes past their cleaning due date or past their usage threshold. These are highlighted in red and sorted with the most overdue items first.
- Due Today -- costumes whose cleaning is due on the current date. Highlighted in yellow.
- Upcoming -- costumes due for cleaning within the next seven days.
Four summary cards at the top of the Cleaning tab show the counts for Overdue, Due Today, Upcoming, and currently In Cleaning. Each cleaning item shows the costume name, ID code, area, cleaning frequency, number of uses since the last cleaning, and the last cleaned date.
To complete a cleaning, click the Mark Cleaned button on any item. A confirmation modal opens where you can optionally add notes about the cleaning. When confirmed, the system resets the usage counter to zero, records the current date as the last cleaned date, calculates the next cleaning due date based on the costume's cleaning frequency, sets the costume status back to "Available", and creates a maintenance log entry of type "Cleaning".
Repair Tracking
The Repairs tab shows all costumes with a "Needs Repair" status. Costumes land here in two ways: they are returned with a Poor condition assessment, or they are manually flagged for repair by an admin.
Flagging a Costume for Repair
You can flag any Available or In Cleaning costume for repair without going through the return process. On the costume card, click the wrench icon button. A confirmation modal explains what will happen: the status changes to "Needs Repair", the condition is set to "Poor", the costume becomes unavailable for assignment, and it is added to the Repairs tab. You can optionally add a note describing the issue (for example, "Torn seam on left sleeve").
Logging a Repair
On the Repairs tab or on any costume card with a "Needs Repair" status, click Log Repair. The repair modal opens with four fields:
Repair Fields
| Field | Required | Description |
|---|---|---|
Repair Description | Yes | A description of the repair work performed. Examples: "Re-stitched torn seam on left sleeve", "Replaced zipper". |
Performed By | No | The name of the person or vendor who performed the repair. |
Repair Cost | No | The cost of the repair in dollars. Tracked in the costume history and included in utilization reports. |
Condition After Repair | Yes | The condition of the costume after the repair. If set to Poor, the costume remains in the repair queue. Any other condition marks the costume as Available. |
When you submit a repair, the system creates a maintenance log entry of type "Repair" with the description, cost, and condition transition. If the condition after repair is Fair, Good, or Excellent, the costume status changes to "Available" and it leaves the repair queue. If the condition is still Poor, the costume remains in the repair queue for further attention.
Inventory Reports
Every costume maintains a complete history of assignments and maintenance activity. Click the clipboard icon on any costume card to open the History modal.
Costume History
The history modal has three summary statistics at the top: total assignments, total maintenance cost, and the average condition at return. Below the stats, two tabs separate the data:
- Assignments -- a chronological list of every employee who has been assigned the costume, including the assigned and returned dates, condition out versus condition in, event information, and any notes.
- Maintenance -- a log of every cleaning, repair, alteration, and inspection performed on the costume, with dates, costs, and condition transitions.
You can export any costume's history to CSV using the Export CSV button in the history modal header. The CSV includes both assignment and maintenance records with all fields, suitable for importing into a spreadsheet.
Utilization Reports
The utilization report provides a high-level view of how your costume inventory is being used across the season. It includes:
- Most Used -- the top ten costumes by total number of assignments.
- Least Used -- the bottom ten costumes by assignment count, helping you identify items that may not be worth storing or maintaining.
- By Area -- costume counts and total assignments broken down by area, so you can see which zones consume the most wardrobe resources.
- Summary -- aggregate totals including total costumes, total assignments, total maintenance cost, and average assignments per costume.
Utilization reports support date range filtering so you can compare usage across different events or time periods.
Season-End Checklist
At the end of your haunt season, use this checklist to ensure every costume is properly accounted for before going into off-season storage.
- Return all outstanding costumes. Use the
Bulk Returnfeature for each recent event date. Check the "Assigned" stat card to confirm the count drops to zero. Any unreturned costumes after final show night likely need to be tracked down. - Clear the cleaning queue. Switch to the Cleaning tab and process every overdue and due item. Clean all costumes before storing them -- storing dirty costumes leads to mold, odor, and fabric deterioration.
- Resolve the repair queue. Switch to the Repairs tab and log repairs for every item. For costumes that are beyond repair, update their status to "Retired" by editing the costume and changing the condition or deactivating the record.
- Review utilization reports. Pull the utilization report for the full season. Identify costumes that were never or rarely used -- consider repurposing, altering, or retiring them. Note high-cost maintenance items that may need replacement.
- Update storage locations. As you pack costumes into off-season storage, update the Storage Location field on each costume so your team can find them quickly when next season begins.
- Export costume history. Export CSV histories for key costumes as a permanent record of the season. This data is useful for insurance documentation, budgeting, and replacement planning.
Best Practices
- Use descriptive costume names. "Zombie Prom King (Tuxedo + Mask)" is far more useful than "Costume 14". When employees check their upcoming costume assignments, a clear name tells them exactly what to grab from storage.
- Set cleaning frequency at creation time. The automated cleaning schedule depends on this value from the very first return. Delicate fabrics and items worn close to the skin benefit from "After Each Use". Rubber masks and durable accessories can use "Every 3 Uses" or "As Needed".
- Record storage locations consistently. Adopt a simple naming convention like "Rack A, Shelf 3" or "Trailer Bin 12". This turns the costume search feature into a quick-lookup tool when someone needs to find a specific item on-site.
- Always assess condition at return. The condition-at-return data feeds into the average condition metric in history reports. Accurate assessments help you spot costumes that degrade quickly and may need replacement.
- Use Bulk Return after every show night. Processing returns in batches by event date is faster and ensures nothing gets missed. It also creates a clean audit trail linking every costume usage to a specific show night.
Troubleshooting
Cannot assign a costume
A costume can only be assigned if its status is "Available." If the costume is In Cleaning, Needs Repair, Assigned, or Retired, the Assign button will not appear. Process the current state first (return it, mark it cleaned, or log a repair) to return it to Available status. Also verify that the target employee has an "approved" application status -- pending or rejected employees cannot receive assignments.
Costume stuck in "In Cleaning" status
A costume stays in the "In Cleaning" status until you explicitly mark it as cleaned. Navigate to the Cleaning tab, find the item, and click Mark Cleaned. This resets the status to Available and updates the cleaning counters.
Costume not appearing in search results
Search looks at the costume name, ID code, and description fields. If you have a status filter active (one of the stat cards is selected), the search results are scoped to that status. Clear the status filter by clicking the active stat card again, then search. Also confirm the costume has not been deactivated -- only active costumes appear in the default dashboard view.
Cannot delete a costume
A costume with active (unreturned) assignments cannot be deleted. Return all outstanding assignments for the costume first, then try the delete operation again. This safeguard prevents removing inventory records while costumes are still checked out.