User Management
Create and manage user accounts, assign roles, control access, and handle password resets for your organization's staff.
Before You Start
Graveyard Shift separates identity from scheduling into two distinct concepts. Understanding the difference is important before you begin managing users.
- User accounts -- these live in the identity system and control authentication. A user account has an email address, password, name, and one or more roles (such as Admin or Employee). User accounts determine who can log in and what pages they can access.
- Employee profiles -- these live in the scheduler system and contain scheduling-specific data. An employee profile includes position assignments, availability submissions, costume assignments, time clock records, and other operational data.
A person needs both a user account and an employee profile to fully participate in your haunt operations. Creating a user account here does not automatically create an employee profile. The employee registration process (or admin setup through Employee Management) handles that separately.
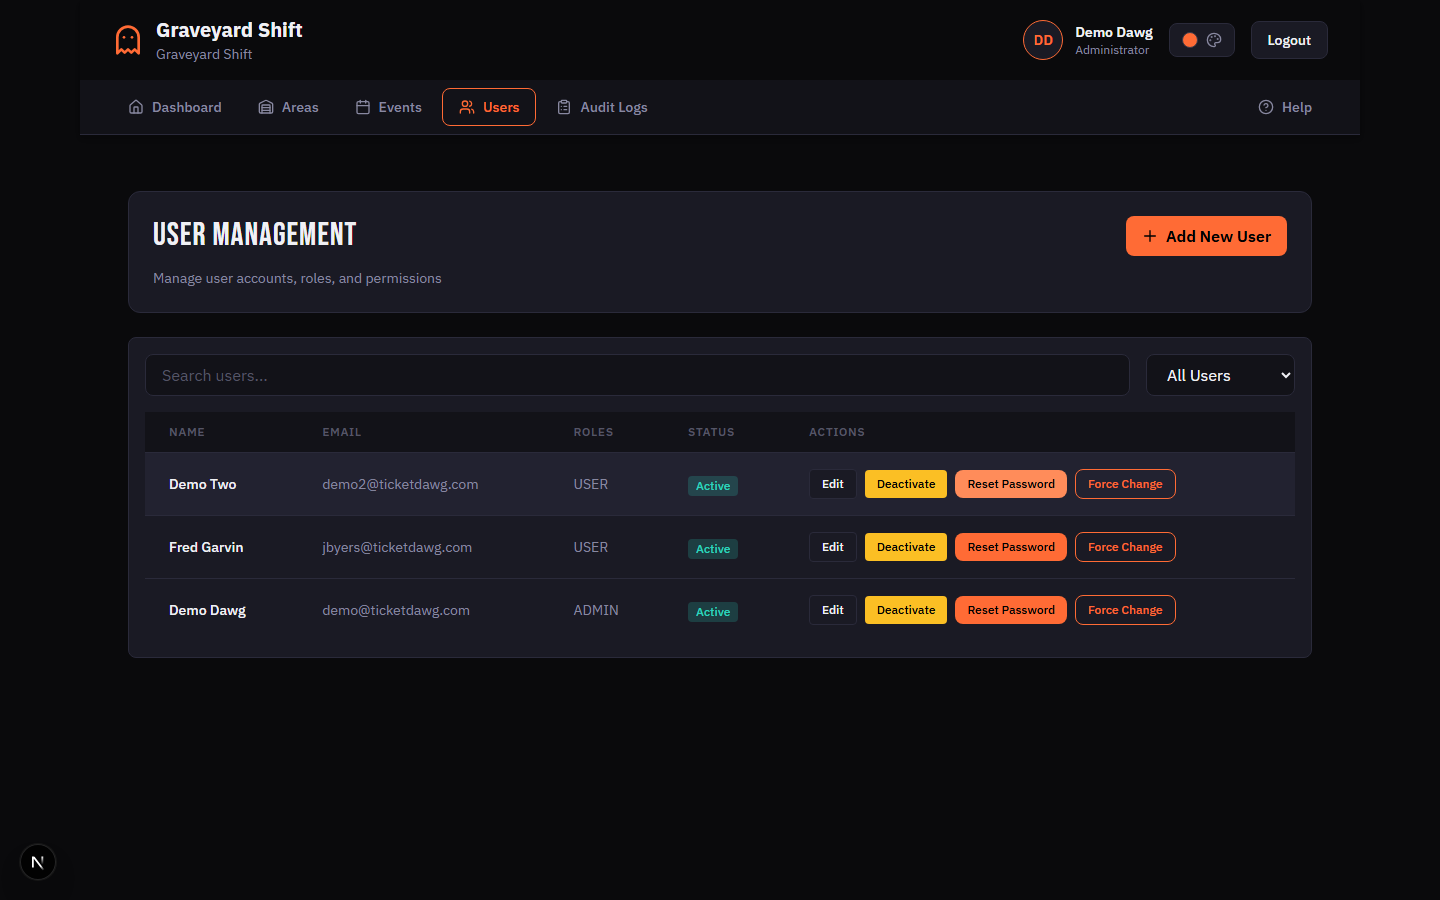
User List
The User Management page displays a table of every user account in your organization. Each row shows the user's name, email address, assigned roles, and current status (Active or Inactive). The table is sorted by creation date with the newest accounts at the top.
Searching and Filtering
Two controls at the top of the table help you find specific users:
- Search bar -- type a name or email address to filter the list in real time. The search matches against first name, last name, and email.
- Status filter -- use the dropdown to show All Users, Active Only, or Inactive Only. This is useful when you need to audit deactivated accounts or focus on your current active roster.
Each row in the table includes action buttons for Edit, Deactivate (or Activate for inactive users), Reset Password, and Force Change.
Creating User Accounts
Admins create user accounts on behalf of staff members. This is the only way to add new login credentials to your organization. Follow these steps to create a new user.
Open the User Management page
From the admin navigation, go to User Management. The page displays a table of all user accounts in your organization with their name, email, roles, and active status.
Click Add New User
Click the Add New User button in the top-right corner of the page header. This opens the Create New User form.
Fill in the user details
Enter the new user's first name, last name, email address, phone number, date of birth, and gender. All fields are required. The email address must be unique across the entire system -- if an account with the same email already exists, the system will reject the request.
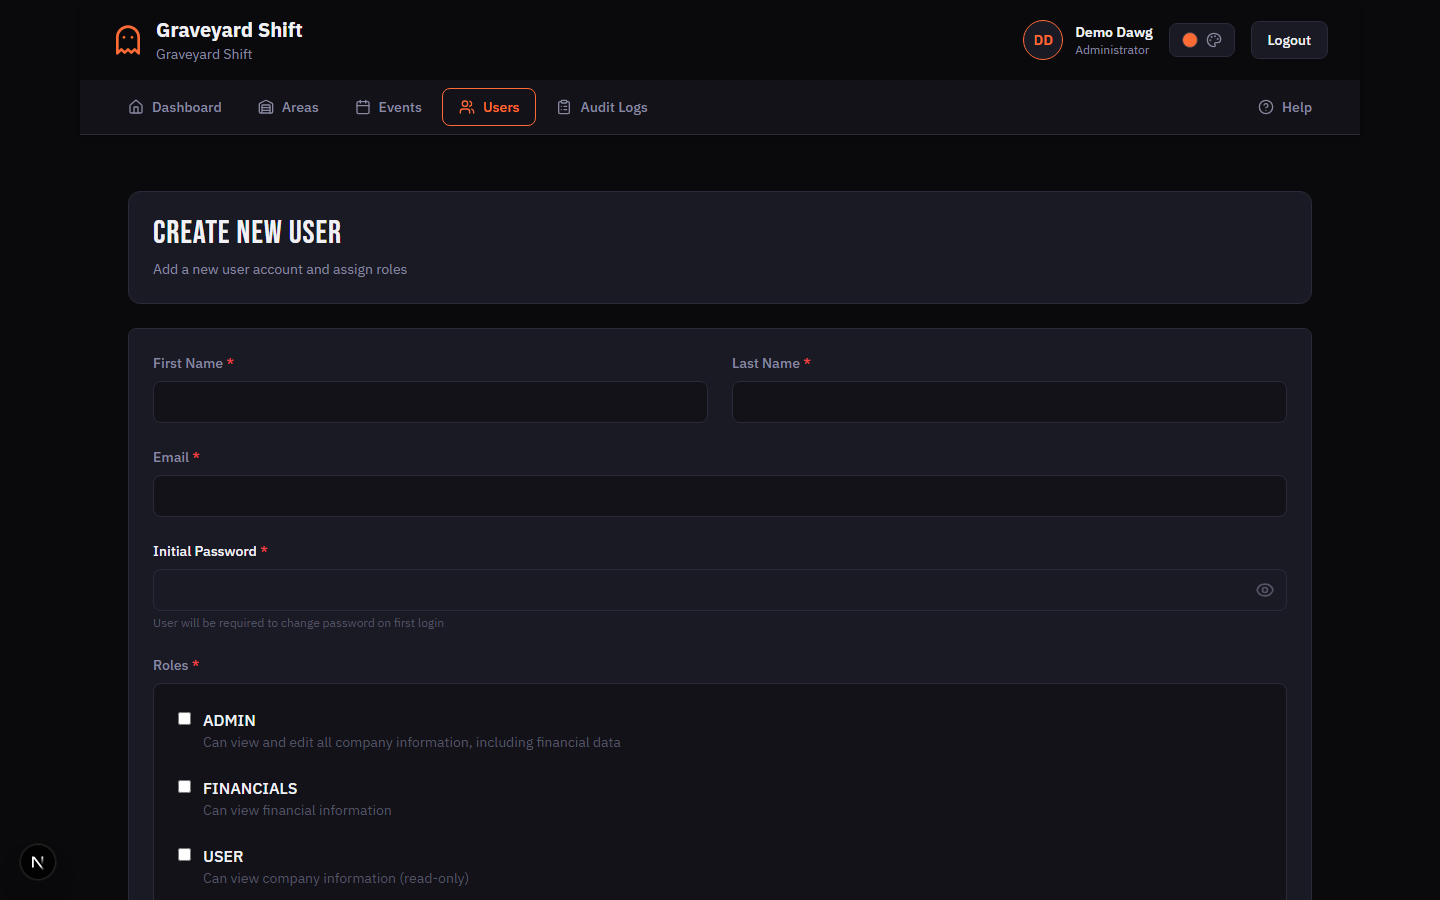
Set an initial password
Enter an initial password for the user. The password must be at least 8 characters long and contain at least one uppercase letter, one lowercase letter, and one number. Share this password with the user through a secure channel. You can optionally force them to change it on first login using the Force Change feature after creation.
Assign roles
In the Roles section, check one or more roles to assign to the user. At least one role is required. The available roles are pulled from your organization's identity system. The two most common roles are Admin (full management access) and Employee (standard staff access). See the Role Assignment section below for a detailed breakdown of what each role can do.
Save the new user
Click Create User to save the account. The system creates the user in the identity system, assigns the selected roles, and redirects you back to the user list. The new user can now log in with their email and the initial password you provided.
User Account Fields
| Field | Required | Description |
|---|---|---|
First Name | Yes | The user's first name. Maximum 100 characters. |
Last Name | Yes | The user's last name. Maximum 100 characters. |
Email | Yes | A valid email address. Must be unique across all users in the system. This is used as the login credential. |
Phone | Yes | The user's phone number. Maximum 20 characters. Formatting characters (dashes, parentheses, spaces) are stripped before storage. |
Date of Birth | Yes | The user's date of birth. Used for record-keeping purposes. |
Gender | Yes | The user's gender. Select from the available options in the dropdown. |
Password | Yes | The initial password for the account. Must be at least 8 characters and include one uppercase letter, one lowercase letter, and one number. Only required when creating a new user -- not shown when editing. |
Roles | Yes | One or more roles to assign. At least one role is required. Roles determine what the user can access within the application. Common roles are Admin and Employee. |
Force Change on the user list to require the new user to pick their own password on first login. This avoids the security risk of the admin knowing the user's permanent password.Editing User Accounts
You can update any user's personal details and role assignments from the Edit User form. Password changes are handled separately through the Reset Password action on the user list.
Locate the user in the list
Use the search bar to find the user by name or email, or scroll through the table. You can also use the status filter dropdown to show only active or inactive users.
Click Edit
Click the Edit button in the Actions column for the user you want to modify. This opens the Edit User form pre-populated with the user's current details.
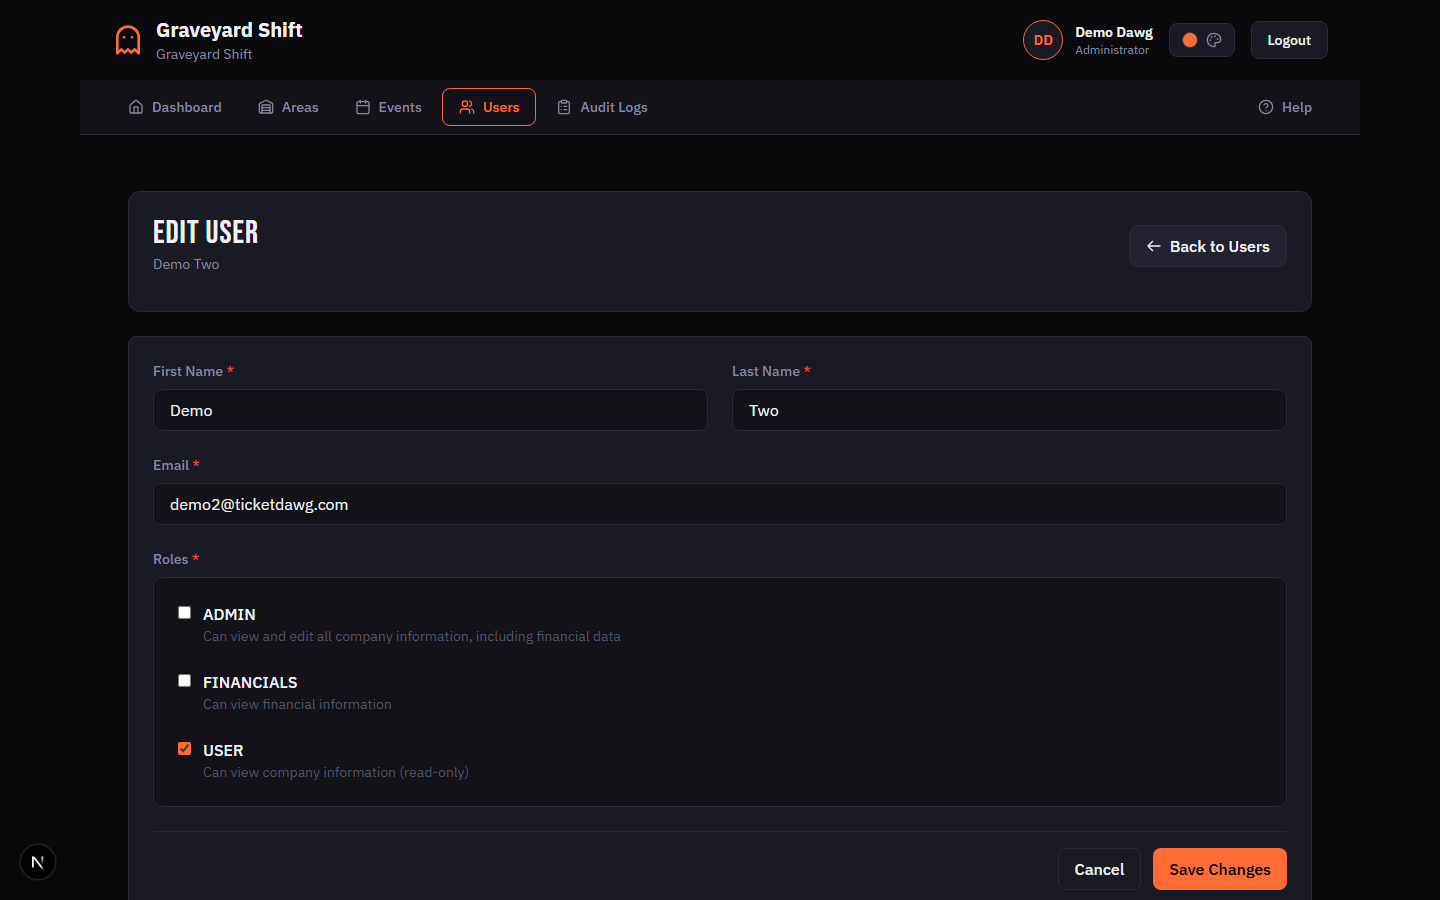
Update the fields
Modify any of the user details: first name, last name, email, phone, date of birth, or gender. You can also change the user's role assignments by checking or unchecking roles in the Roles section. Note that the password cannot be changed from this form -- use the Reset Password or Force Change actions on the user list instead.
Save your changes
Click Save Changes to apply the updates. The existing role assignments for this user are replaced with your new selection. The system redirects you back to the user list after a successful save.
Role Assignment
Roles control what a user can see and do within Graveyard Shift. Each user must have at least one role. Roles are assigned during account creation and can be modified at any time through the Edit User form.
Available Roles
Role Permissions
| Field | Required | Description |
|---|---|---|
Admin | No | Full management access. Can create and edit users, manage events and areas, build schedules, send messages, configure system settings, view reports, and access all admin pages. Admins can also toggle user active status and reset passwords. |
Employee | No | Standard staff access. Can view their own schedule and assignments, submit availability for events, clock in and out, view messages, manage their own profile, and access the employee dashboard. Cannot access admin pages or manage other users. |
How Roles Work
Roles are enforced at the page level and the API level. When a user navigates to an admin page, the system checks their session for the Admin role. If the role is missing, the user is redirected to their dashboard. The same check applies to every API endpoint -- a user without the Admin role cannot call admin API routes regardless of how the request is made.
Roles are scoped to your organization. A user can have different roles in different organizations if they belong to more than one. The role assignment on the User Management page only affects roles within your current organization.
Account Activation and Deactivation
Every user account has an active or inactive status. Active users can log in and use the application. Inactive users are locked out and cannot authenticate. Deactivation is the recommended approach when a staff member leaves -- it preserves their historical data while preventing further access.
Deactivating a User
Click Deactivate on the user row
On the user list, click the Deactivate button for an active user. A deactivation modal opens that checks for any future schedule assignments and availability records.
Review future assignments
If the user has future schedule assignments or availability records, the modal displays them in a table showing the event name, date, area, position, and shift time. This helps you understand the scheduling impact before proceeding.
Choose whether to remove future records
A checkbox labeled "Remove user from all future events" is checked by default. When checked, all future schedule assignments and availability records are deleted upon deactivation. Uncheck this option if you want to preserve the records for reference. Past records are always preserved regardless of this setting.
Confirm the deactivation
Click Deactivate User to confirm. The user's account is set to inactive and they can no longer log in. A success message displays how many assignments and availability records were removed, if any.
Reactivating a User
To reactivate an inactive user, click Activate on their row in the user list. The account is immediately restored and the user can log in again. No confirmation modal is shown for activation since it is a non-destructive action.
What Deactivation Means
- The user cannot log in to Graveyard Shift.
- Future schedule assignments and availability records can be optionally removed at the time of deactivation.
- Past schedule history, time clock records, and message history are preserved for reporting purposes.
- The user still appears in the user list with an
Inactivestatus badge so you can reactivate them later if needed. - The user's account is not deleted. Graveyard Shift uses soft deactivation, not permanent deletion.
Password Management
Admins have two password-related actions available for each user on the user list. These serve different purposes and can be used together or independently.
Reset Password
The Reset Password action lets you set a new password for a user. This is typically used when an employee is locked out of their account and cannot use the self-service password reset flow. The admin enters a new password, confirms it, and the change takes effect immediately.
Click Reset Password on the user row
On the user list, click the Reset Password button for the target user. A modal opens prompting you to enter a new password.
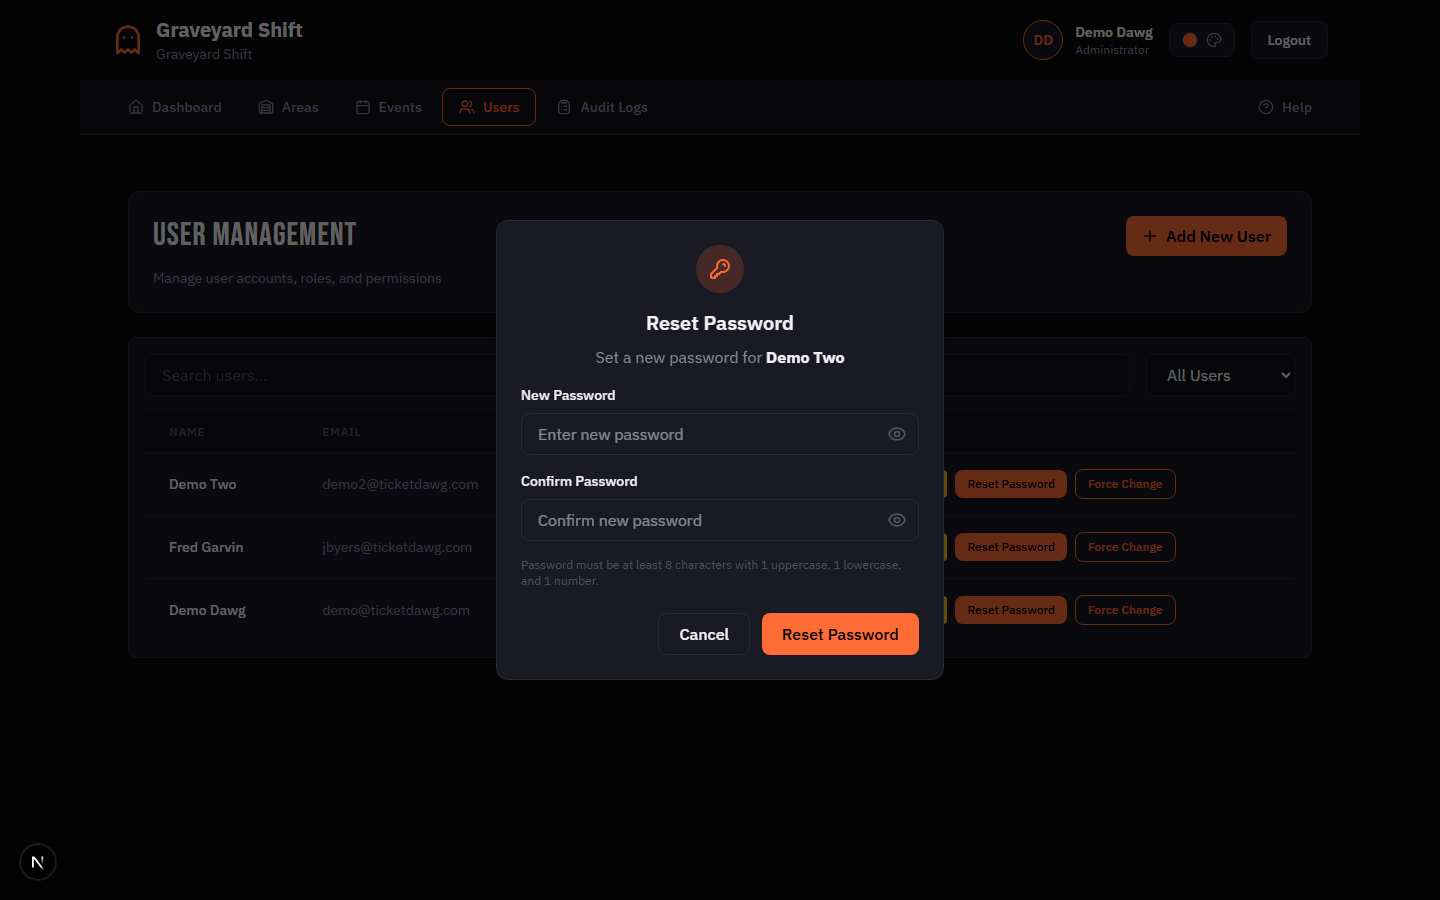
Enter the new password
Type a new password in the New Password field and confirm it in the Confirm Password field. The password must meet the same requirements as the initial password: at least 8 characters with one uppercase letter, one lowercase letter, and one number.
Click Reset Password
Click the Reset Password button to apply the change. The user's password is immediately updated and the force-reset flag is cleared, meaning they will not be prompted to change it again on login unless you separately use the Force Change action.
Force Password Change
The Force Change action does not modify the user's current password. Instead, it sets a flag on the account that forces the user to choose a new password the next time they log in. A confirmation dialog asks you to verify before proceeding.
This is useful in two scenarios:
- After creating a new account -- you set an initial password during creation. Force Change ensures the user picks their own password on first login, so the admin no longer knows their credentials.
- Security concerns -- if you suspect a password has been compromised or shared, Force Change requires the user to set a new one without you needing to know what it is.
Password Requirements
All passwords in Graveyard Shift must meet these minimum requirements:
- At least 8 characters long
- At least one uppercase letter (A-Z)
- At least one lowercase letter (a-z)
- At least one number (0-9)
These requirements apply to initial passwords set during account creation, passwords set via Reset Password, and passwords chosen by users during a forced password change. Passwords are stored using bcrypt hashing and are never visible in plain text after creation.
Best Practices
- Always use Force Change after creating accounts. When you create a new user account, you set the initial password. Immediately use the Force Change action so the user picks their own password on first login. This keeps credentials private and reduces the risk of shared passwords.
- Deactivate rather than ignore unused accounts. When a staff member leaves or finishes for the season, deactivate their account promptly. Inactive accounts cannot be used to log in, protecting your organization from unauthorized access. You can always reactivate the account if the person returns next season.
- Limit the number of Admin accounts. Only give the Admin role to users who genuinely need management access. Every admin can create users, modify schedules, reset passwords, and view all organizational data. For staff who only need to view their schedule and clock in, the Employee role is sufficient.
- Review your user list at the start of each season. Before a new haunt season begins, review the user list and deactivate any accounts for staff who are not returning. Activate accounts for returning staff and create new accounts for new hires. This keeps your active roster clean and your scheduling workflows efficient.
Troubleshooting
User cannot log in
First, check the user list to confirm the account is active. An inactive account cannot authenticate. If the account is active, the user may have the wrong password. Use Reset Password to set a new one and share it with the user through a secure channel. If the user has a force-change flag set, they will be prompted to pick a new password on login -- make sure they understand this step.
Duplicate email error when creating a user
The system requires every user to have a unique email address. If you see a "User with this email already exists" error, the email is already associated with another account. Search the user list for that email to find the existing account. If the account belongs to a different organization, you cannot reuse the email -- the user must use a different email address or be added to your organization through the identity system.
User does not appear in scheduling
Having a user account alone does not make someone available for scheduling. The user also needs an approved employee profile in the scheduler system. Check Employee Management to confirm the employee has registered and been approved. Additionally, the employee must have position assignments and submitted availability before they can be scheduled.
Removed assignments after deactivation
If future assignments were removed during deactivation (the "Remove user from all future events" checkbox was checked), those records are permanently deleted and cannot be recovered. If you reactivate the user, you will need to manually rebuild their schedule assignments and availability through the Staff Scheduling and Availability Tracking features.